Mac Mini Merom Hack
Vintage Blog from 2006
6-Mar-09 Update: I originally wrote this article in 2006, but there is still a lot of interest in this topic because of the dramatic speed increase you can get with the T7600 upgrade. Apple recently released their latest Mac Mini (dubbed the “Mac mini (Early 2009)” with an Intel Core 2 Duo P7350 at 2.0 GHz (2 cores)). Curious to compare the latest mini with my T7600 upgraded ’06 vintage mini, I conducted the latest GeekBench test (using the 32-bit version of Geekbench 2.1.2 available here). I am pleased to report that my old mini scored 3060 (click here for full results). This is in comparison to 2768 for the new mini. There is a nice benchmarking of all the stock versions of the Mac Minis here.
Several people have already put together web pages with photos on how to upgrade the processor on an Intel Mac Mini. The ones I've found so far have been upgrades either of a Core Solo to Core Duo or upgrades to a Core 2 Duo T7200 (2.00Ghz) or T7400 (2.16Ghz). As of this writing, I haven't yet seen any benchmarks of a Mac Mini with a T7600 (2.33Ghz).
The purpose of this page is less about bragging (I certainly wasn't the first to upgrade the processor in my Mac Mini) and more about describing my experience with the upgrade - both from a performance perspective and from a "lessons learned" perspective.
Background:
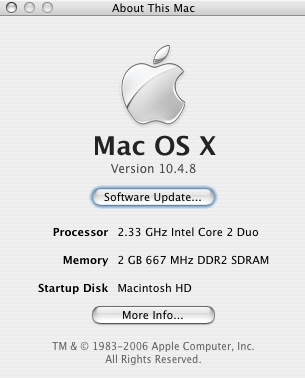
The Core Duo Mac Mini that I bought in early 2006 contained an Intel T2300 chip running at 1.66Ghz with a 2MB L2 Cache.
In mid-2006, Intel introduced the Core 2 Duo line which is pin compatible with the Core Duo series and has some significant improvements including higher clock speeds, improved processing performance, improved power management, a larger L2 cache and 64-bit support. The Intel web site has tons of marketing and technical info on the new architecture.
My previous experience with pin-compatible drop-in CPU replacements has yielded negligible performance improvements. (At the risk of revealing my age, these upgrades included the installation of a Motorola 68010 into my 68000-based Amiga and the installation of an NEC V20 into an Intel 8088-based Bridgeboard).
Driven by a sense of curiosity, I wanted to see what kind of improvement I could make in my little Mini.
Physical Installation:
The process of upgrading the processor is fairly straightforward. If you've installed or upgraded memory in your Mini, you've already done most of the work. There is a good write-up (including pictures) of how to do a CPU swap here and here. My recommendation is to do a Google search on Mac Mini CPU upgrades and read a few of the instructions so you get a feel for it. There is no real magic and my upgrade went without a hitch.
The basic steps of the upgrade are:
1) Open the case using a scraper or other flat metal object
2) Remove the wireless antennae by gently squeezing the plastic clips that hold them in place
3) Remove the drive subassembly (4 screws, one in each corner)
4) Disconnect cables from the subassembly to the main board - this will let you completely free the subassembly
5) Remove the metal standoff at the front-left of the motherboard using a flat-head screwdriver
6) Remove the motherboard
7) From the bottom of the motherboard, using needle-nosed pliers, gently squeeze the four white plastic clips that hold the CPU heat sink in place (it's the one towards the right at the rear of the motherboard)
8) Thoroughly remove the old heat transfer material from the heat sink (I used a scraper followed by methylated spirits)
9) Unlock the old CPU by turning the single flat-head screw on the socket and replace it with the new one
10) Apply thermal paste to the new CPU and reinstall everything in the reverse order.
My words of advice are:
1) Check the orientation of the heat-sink before you put it back - the holes line up in any direction, but the hard drive chassis wont go on unless you have it in the right orientation.
2) Be very careful with the white plastic pieces that hold the heat sink in place. I didn't break mine, but it's obvious that if you break them, you will set yourself up for a big headache.
3) Keep track of all the little connectors you unplug from the motherboard (e.g. heat sensor, infrared sensor, etc.) and make sure you plug them all back in before closing up the Mac.
4) While you've got the machine completely opened up, go ahead and max out the memory capacity by installing a pair of 1GB DDR2 SDRAM memory.
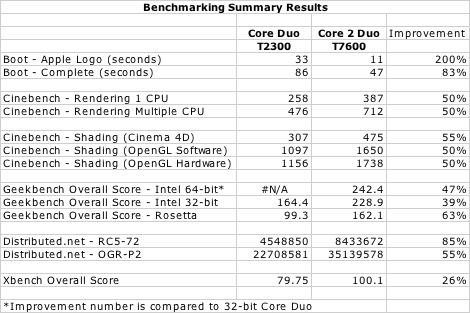
Summary Performance Results:
The upgrade makes a significant difference to the "feel" of the machine. As you can see from the summary results below, the performance improvement is quite real.
The benchmarking software I used was as follows:
1) Boot: Booting up my computer as normal. This will vary for everyone, but the relative performance should be close.
2) Cinebench v.9.5: cinebench95.zip
3) Geekbench 2006 Build 242 (Intel 64-bit): Geekbench2006-MacOSX64.dmg
4) Geekbench 2006 Build 242 (Intel 32-bit and Rosetta): Geekbench2006-MacOSX.dmg
5) Distributed.net v2.9012.497: dnetc-macosx-x86.tar.gz
6) XBench v.1.3: xbench1.3.dmg
I ran each test once on a cleanly booted system. The machine was stock standard except for the memory (2GB Crucial Memory in each instance) and of course the CPU swap. The CPU temperature was surprisingly similar under both scenarios +/- a degree or two.
These results clearly show a material improvement from the upgrade.
If you would like to download a spreadsheet of the results, click here: Benchmark
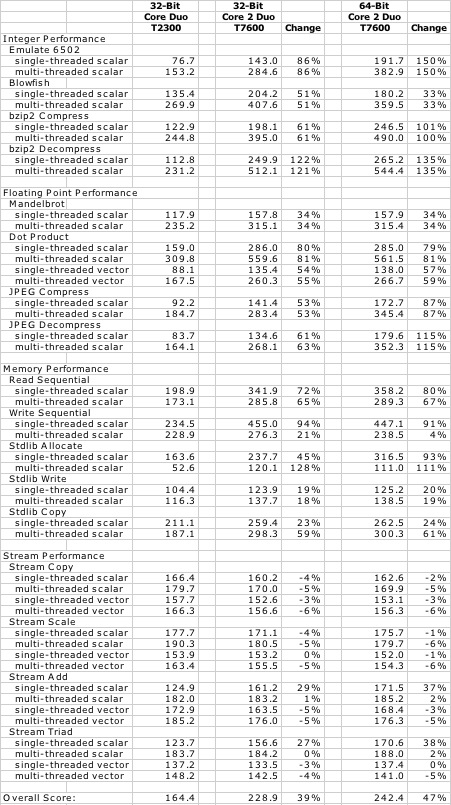
Detailed Results - Geekbench:
Since Geekbench has a 64-bit version, I was able to test the T7600 running 64-bit code. Interestingly the T7600 isn't better than the original T2300 in all cases. On the other hand, there are some tantalisingly large improvements in some of the 64-bit tests - this probably bodes well for when 64-bit support improves for OS X and GUI applications.
I don't know enough about either the benchmarking program or the chip architectures to speculate on the causes of the performance variation between different tests.
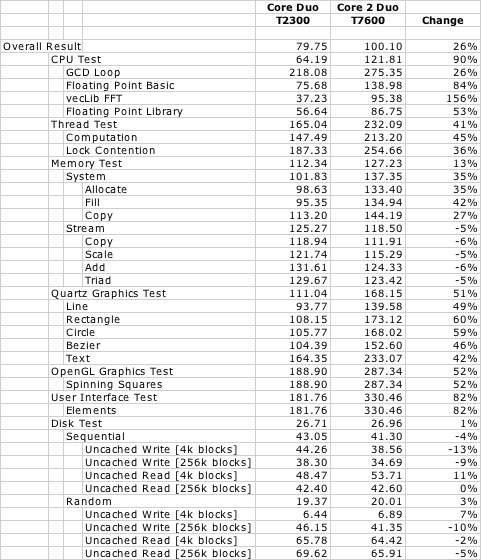
Detailed Results - XBench:
Not surprisingly (because the hard drive is the same under both tests) the disk benchmark isn't improved under the Core 2 Duo. I was a bit surprised that uncached writes were so slow. Also, the Xbench results confirm the Geekbench results with respect to the deteriorated "Stream" performance. Again, I don't have enough technical background to understand why. I have also posted these results to the Xbench comparison site: http://db.xbench.com/merge.xhtml?doc1=207248
If you found this useful and you wish to donate, just click below: