Alfa 147 GTA Battery Swap
Vintage Blog from 2009
Not quite as easy as it should be...
When the engineers at Alfa crammed their largest engine into their smallest car, they created an amazingly fun car - however, not one that is necessarily easy to maintain. Ask anyone who has had to replace a light bulb by first having to remove the entire bumper. My recent replacement of the ageing battery in my 2003 Alfa Romeo 147 GTA required a bit more complexity than I expected from what should be such a simple job.
This page documents the process so that hopefully if you type "Replace 147 GTA battery" into Google, and you get to this page, you'll actually get something useful.
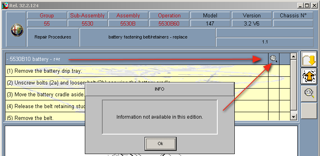
Oh, and just in case you're thinking "Gee, I'll just buy the official service manual that is available on DVD from various eBay sellers" - think again. The Rel 32.2.124 DVD that's floating around doesn't have anything on R+R (Repair & Replace) the battery - as per the screen shot below (click on it to enlarge).
So, let's begin...
Once you know what you're up for, it's not terribly complex... but there are a few pitfalls that hopefully I'll help you to avoid. Please note that these instructions are for educational purposes only; I take no responsibility for any damage or injury that you may cause.
Tools Required
- Socket wrench with 10mm and 13mm sockets (an extender is also helpful)
- Small Phillips (a.k.a. Cross Head) screw driver
- Slotted (a.k.a. Flat Head) screw driver
- Pliers
Parts Required - One Replacement Battery
- Alfa Romeo part 60677704 - 12V 60Ah 400A or
- Exide / Champion DIN55 or ACDelco S55457 or DELKOR 90R500
Step 1 - Remove the Negative Terminal Cable
First, remove the negative cable. It's important to remove the negative cable first so that the chassis of the vehicle is not "negative" while you are doing Step 2. If you don't do this and a tool accidentally touches the chassis while also touching the positive terminal, you may damage something or injure yourself. Use the 10mm socket or pliers to loosen the nut labeled A in Figure 1 below. Once it's loose you can slide the cable off the negative terminal. For maximum safety, it's best to cover up the negative terminal at this stage.
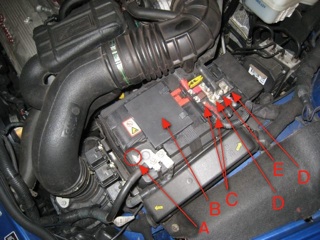
Figure 1 - Click the Image to Enlarge
Step 2 - Remove the Positive Terminal Assembly
Now, remove the cover over the positive terminal (it has been removed and labeled B in Figure 1 above). Next, using the Phillips screw driver, remove the two small screws marked C in Figure 1. You will note that they screw into specific holes in the Alfa factory battery - these holes should also exist in the generic after-market replacement battery. You can see a closer shot of these holes in Figure 6 below.
Next, remove the two 10mm nuts marked D and then the 13mm nut marked E. You should now be able to lift up the assembly. Once lifted up, the battery should look like "F" in Figure 2 below.
Step 3 - Move the Air Intake Hose Out of the Way
Because of the tight engine compartment of the GTA, removing the battery requires sliding the air intake hose out of the way. To do so, use the slotted screwdriver to loosen the clamp marked G in Figure 2.
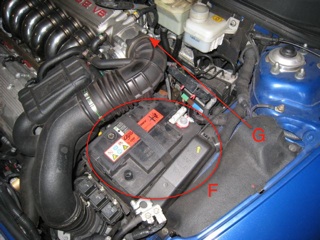
Figure 2 - Click the Image to Enlarge
Once the bracket is loosened, you can pull it off the throttle body (the thing it's attached to) and lift it up just enough to give you the clearance you need to remove the battery. This is shown in Figure 3 below. You should be careful to do this gently. You don't want to break anything else, since you'll notice that the hose is connected to a bunch of other stuff.
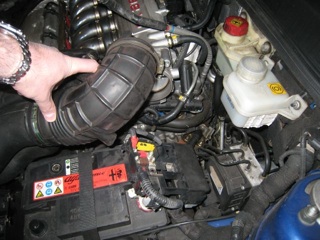
Figure 3 - Click the Image to Enlarge
Step 4 - Remove the Battery Strap
You will notice that a strap is holding the battery in place. You can remove this strap by removing the 13mm nut shown as H in Figure 4 below. The photo is not really clear, but you'll find this nut to the left of the battery (if you are facing the front of your car).
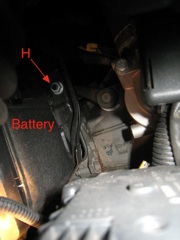
Figure 4 - Click the Image to Enlarge
Step 5 - Remove the Battery
The battery is now free and can be removed. Keep in mind that it's heavy (about 16kg). Your engine bay will now look like Figure 5. You can see the strap which is now on the left of the picture.
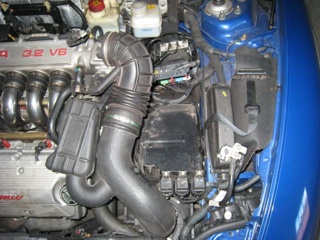
Figure 5 - Click the Image to Enlarge
Step 6 - Prepare the Replacement Battery
You will need to remove the battery blanket (which is held together by velcro) and place it on your new battery. It is marked I in Figure 6. You will also need to remove the "tree" on the positive terminal (marked K in Figure 6). This is held on by a single 10mm nut which just needs to be loosened to remove the assmebly. Put the blanket and the tree onto the new battery. In addition you'll notice the two little holes (marked J in Figure 6) which your new battery should also have.
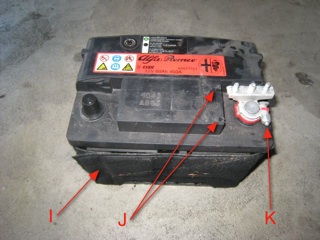
Figure 6 - Click the Image to Enlarge
Due to the design of the 147 battery compartment, the strap assembly is extremely sensitive to the exact size of the battery. The one that I bought had shims that had to be removed from the battery (as in Figure 6a below). You can remove them easily with your hand, they just pry off (held in place by some plastic pegs). Once removed, you can discard them. If you don't remove them, you cannot clip the strap back on.
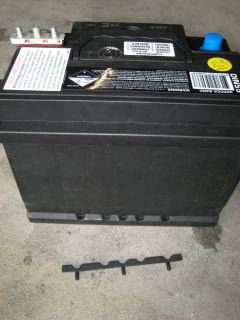
Figure 6a - The replacement battery with the shim removed
Step 7 - Put Everything Back
You should be able to simply reverse these instructions to put everything back together... The good news is that although your trip odometer, trip computer settings (avg. consumption, etc.) and day / date will reset - it seems that the radio keeps its settings. Also, I didn't have any problems with any error messages on the dashboard display (some have reported error messages related to the ABS or Airbag).
A Word of Caution
The correct replacement battery will have several key elements in addition to being the same physical size. Refer to Figure 7 below for a comparison of the original Alfa battery (left) with the correct replacement battery (right).
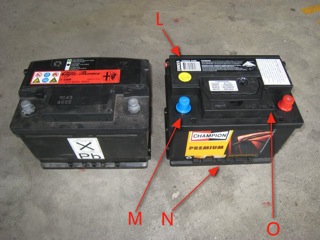
Figure 7 - Click the Image to Enlarge
- L: Meets minimum capacity specification - 12V 60Ah 400A
- M: The Positive / Negative terminals in the correct orientation
- N: The correct size of base (also see Figure 6a above)
- O: The two little holes next to the Positive terminal (also see Figure 6, item J)
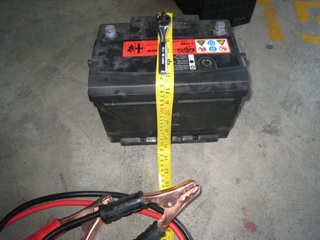
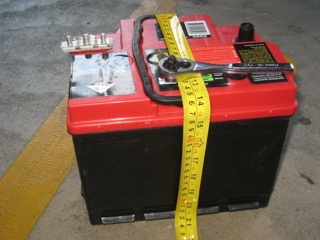
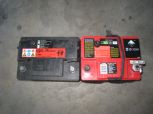
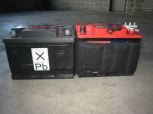
Figure 8 - The images above show the incorrect replacement battery - with the red top
The design of the strap (which doesn't stretch or have any way to adjust its length) means that the replacement battery must have exactly the same sum of height + width as the factory battery. You can see that first replacement battery (which otherwise is almost identical in size) requires a strap which is 3cm longer.
So, I had to put the old battery back in, and go back to the car parts store - where they couldn't find an appropriate battery in stock... so they had to order it.
As you can see, just because a replacement battery looks similar - doesn't mean it will fit! :(


